Compressing Textures for use in WorldsPlayer
Both Worlds Chat and WorldsPlayer use a proprietary texture format called CMP (compressed bitmap), also known as MOV (movie) or QT (???). It is based off of the Microsoft BMP and Sun RAS formats. It was originally made for Worlds Chat in 1994 which used an in-house 2.5D rendering engine called Accomplish. Support for the format was later ported to WorldsPlayer when the developers switched the engine to Renderware.
CMP files are used all over Worlds. While you never need to use CMP files, they can play a huge role in both saving bandwidth and allowing for some neat tricks. In particular, the "MOV" format allows you to create animations, multi-sided 2D objects and avatars (like the enemies in DOOM), and high-definition "tiled" textures split up into smaller pieces.
CMP/MOV is a texture format used exclusively by Worlds.com. It is NOT:
- In any way related to the LEADTools CMP format.
- or related to the texture files used in some Psygnosis games
- or related to the QuickTime video format.
These are all wildly different file formats that just happen to share the same file extension by coincidence. Do not try to use editing tools for other software to edit CMPs or MOVs directly, it will not work.
Understanding the CMP Format
CMP textures are lossily-compressed images with indexed palettes. What this means is that each image is assigned a set of colors, and then each pixel references a color from the palette, similarly to sprites from many retro game consoles. This saves a lot of memory when only a few colors are used, but the efficiency of the palette depends on what compression settings you use when generating the texture.
For a 16-frame MOV, this is what the average compression ratio looks like, using the full 256 colors and no fixed palette:
To compress our textures, we use a tool from the Accomplish SDK called COMPIMG. This program is very difficult to work with because it's documentation isn't very extensive and it's very picky about what images you use. Pay close attention to this guide, because otherwise you are going to spend hours pulling your hair out.
The SDK included on Jimbly's website includes several examples. You can download COMPIMG from his page here or download it from my site here.
Here are the limitations you need to keep in mind when generating your texture file:
- COMPIMG only accepts BMP images as the source file. You can't use a PNG, JPEG, or whatever else you feel like using
- The source image must be an 8-bit BMP file, meaning a maximum of 256 colors. You may use a 24-bit BMP as the input image, but it will be converted down to an 8-bit image by an executable plugin called compimg.ovl. This converter program can only run on 16-bit-compatible versions of Windows and won't work on a modern computer, so if you can't convert your BMP to 8-bits for some reason, you need to have a Windows 9x machine ready.
- Image resolution must be power of 2 in size (2, 4, 8, 16, 32, 64, 128, 256...)
- Images larger than 256x256 will be internally downscaled by WorldsPlayer. If you want to create high-resolution textures, you need to split the image into chunks and create an MOV, then tell Worlds how many segments to stitch together when loading the texture (more on this later).
- The source image cannot have any color profile embedded into it's header. GIMP 2 likes to embed color information into the image by default. Disable this feature when saving your image, or else COMPIMG will not be able to read it.
Creating Your Own Basic CMP
Place the source files for your CMP into the directory where compimg.exe is located. Open a terminal in that directory, then run this command, replacing "castle.bmp" with the name of your single BMP file.
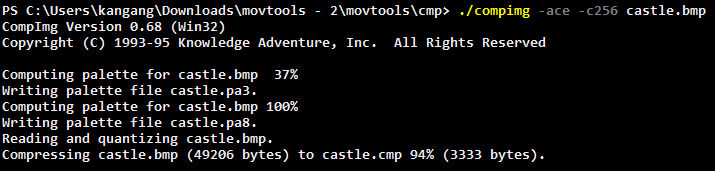
"-ace" inserts the default settings. "-c256" sets the image to a 256 color image, change the number to any value between 1 and 256 depending on how many colors you want. You can also add "-pt" if you don't want to generate a palette at all.
You can play around with some of the other options listed in the help screen, which you can view by just running compimg.exe without sending any command line arguments to it. They can be a little tricky to work with, so search on the Worlio forums if you need help.
Creating a High-Resolution CMP
Split your image into 256x256 chunks, then save each chunk. Doing this manually can be a pain in the ass, so using a PDN or GIMP plugin to do the image splicing work for you can help. However, a lot of these plugins don't present options for 8-bit color when exporting, so there's a pretty high chance you'll want a virtual machine ready for this one.
Here's some of the parts of my image. The texture is 512 pixels wide and 512 pixels tall. You can split into chunks as large as 256x256 if you want to, but for this one I split it into chunks of 128x128. This gives us a total of 16 chunks, that's 4 chunks wide and 4 chunks tall.
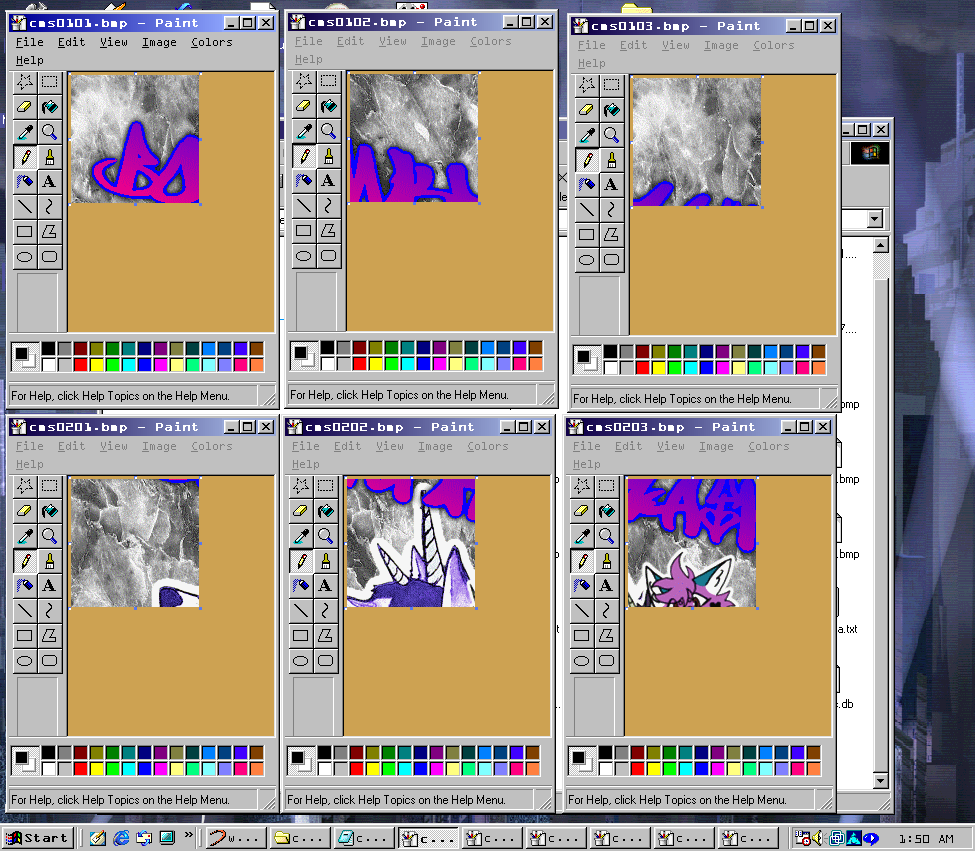
Let's create a list of each chunk for COMPIMG to use. Order them progressively from top left to bottom right, moving along each row. Save the TXT file.
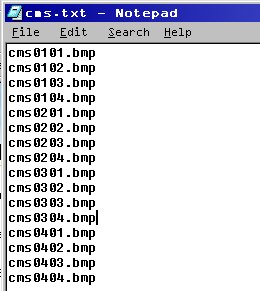
Here comes the fun part. Run COMPIMG with the following arguments. Replace "255" with the number of colors you want, "cms" with the name of the output file and "cms.txt" with the name of your chunk list. You should get a new MOV file where you ran COMPIMG.

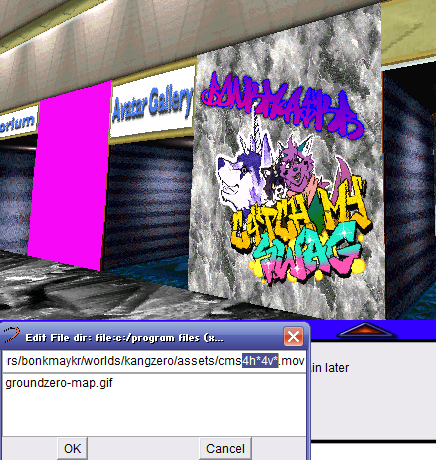
Now add the new texture to an object in the Shaper, and put "Xh*Yv*" at the end of the filename (but before the file extension). Replace X with the number of columns and Y with the number of rows, and Worlds will stitch together the MOV frames into one image.
Protip: You can also insert "Zs*" before the column and row counter to tell Worlds which set of frames (what "side") to use, just replace Z with a number. For example, if you split each image into 4 pieces (2 columns and 2 rows) and you have 8 frames, you can use "1s*2h*2v*" to create a texture from frames 1 to 4, and then use "1s*2h*2v*" to create another texture from frames 5 to 8. This is great if you want to have multiple different high-resolution textures in the same file, especially for use with HD holograms. Thanks DOSFox!
Creating Holograms and Avatars
The process for creating holograms is mostly the same as for making high-res textures, but the way you organize the images beforehand is different. You take anywhere from 2 to 8 frames, one for each direction you could be facing, and convert them into an MOV.
Of course, if you want your fake 3D objects to be believable, you better make them transparent! Tell COMPIMG what pixels are transparent by using "-tX,Y" as a command line argument, replacing X and Y with the location of a transparent pixel. You can also just use "-t" and COMPIMG will automatically pick the top-left pixel. Fill the background with a color that your opaque, visible parts of the image are not using. Any pixel of the selected color will be removed from the texture by COMPIMG.

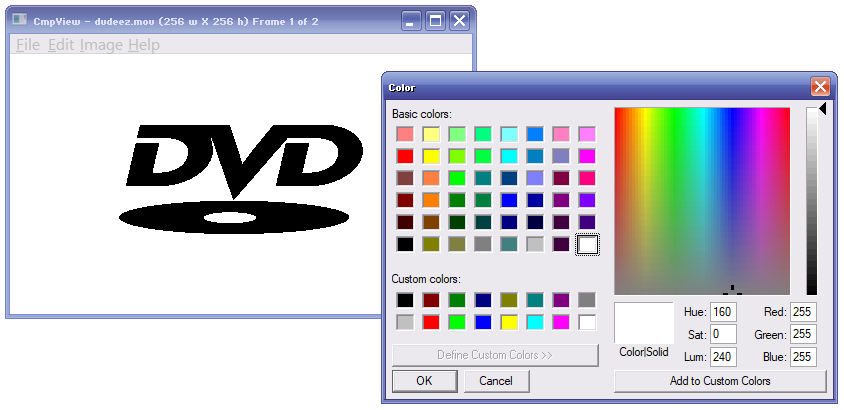
The green box around this DVD logo won't appear in Worlds, it's just there to tell COMPIMG what parts not to show.
You'll know that you did everything correctly if the background disappears when opening the texture in CMPVIEW (included with COMPIMG). If you want to double-check, you can change the background color of the window to make sure there's no ugly artifacts.
The rest of the process is basically the exact same as before, but here you don't need to add the chunk information to the end of the file name, unless you decide to make an HD hologram by combining the two techiques. As mentioned before, DOSFox has his own tutorial on how to do that.